
Page Contents
Filters Basics
What are filters?
Filters enable you to highlight, or "kill" (remove) certain articles based on a set of criteria that you specify. They provide a very useful way of drawing your attention to articles that might be of interest, and in filtering out those that you don't want to see (like "$$$ MAKE MONEY FAST $$$" posts). On UNIX systems, a "killfile" is such a set of criteria used to remove unwanted articles, and the term "killfile" is still applied to filtering functions on some news clients.
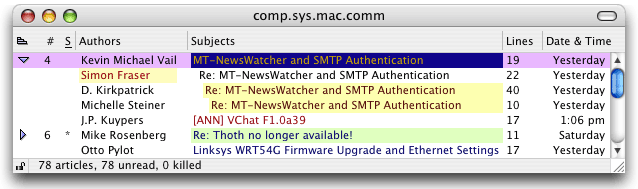
This image shows a subject window for comp.sys.mac.comm, showing articles which have been highlighted by filters for the words "MT-NewsWatcher" in the subject, a subject starting with "[ANN]" (for an announcement), and "Thoth" and "Linksys" in article subjects. The posts with brown subjects on a yellow background have highlighted articles which are replies to my posts, by looking for "smfr" in the References header.
How filters work
Filters simply scan through the text of article headers (which may contain the author's name, organization, the article subject line, the date of the article, the number of lines in the article etc.) looking for certain text strings or regular expressions. Articles that are found can then either be highlighted (causing the author or title to be colored in the Subject window, as above), or killed (meaning that they are marked as read before you ever see them). For finer control over article priorities, you can have filters assign a score to articles which they match, and set up a collection of filters with a range of scores corresponding to your level of interest in articles which they match. Scoring is described in more detail later.
For each group, or hierarchy of groups on the news system, you can also specify whether to keep or delete articles that do not match the filters you have set up. This makes it possible to set up a collection of filters that catch only the articles that you are interested in, and delete the rest. This is described in more detail in the next section.
There is one special kind of filter, the Junk Message filter, which is described in the Filtering Junk Messages chapter.
Working with Filters
The Filters Window
The list of filters which are currently defined is shown in the Filters window, which is accessible via the item in the menu. This window provides you with complete control over you filter collection, through extensive drag and drop support, and the Group Filters and Edit Filter dialogs.
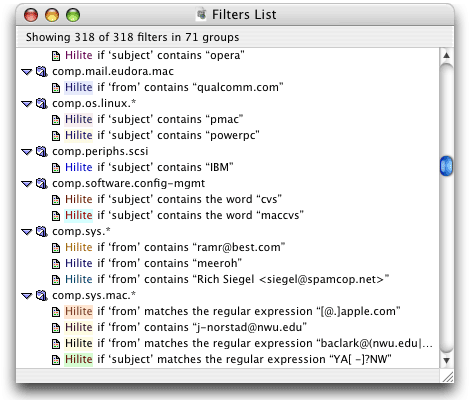
The Filters window displays a hierarchical list of filters, grouped according to which set of newsgroups they apply to. For example, filters in the "comp.sys.*" group will apply to all the newsgroups that start with "comp.sys.", like "comp.sys.mac.comm" and "comp.sys.linux", but not "comp.sys". This means that when you open the newsgroup "comp.sys.mac.comm", filters in each of the following groupings will be applied:
comp.*
comp.sys.*
comp.sys.mac.*
comp.sys.mac.comm*
The icons for each filter show information about the filters, such as whether they expire or whether they cannot be overridden by other filters:
| A normal filter. | |
| A filter which is set to expire at a given date. | |
| A filter which is set to autoexpire (expire after a given period of disuse). | |
| A filter which has expired. It will be removed from the list the next time you run. | |
| A filter that cannot be overridden by other filters. | |
| A expiring filter that cannot be overridden. | |
| A autoexpiring filter that cannot be overridden. | |
| A expired filter that cannot be overridden. |
The group categories also have an icon that indicates their behavior:
| A normal filter category. | |
| A filter category that causes only articles matched by filters to be displayed (as set in the Group Filters dialog) |
Most filter operations can be achieved through drag and drop. For example, you can drag a group into this window from a list of subscribed groups, and a new group category will be created for it (if it does not already exist).
The results from a drag from the Full Groups window depend on what item
was dragged. You can drag a folder item (for a level of the group hierarchy)
to create a holder for filters which apply to all groups which belong to
that part of the hierarchy. For example, dragging the comp.sys.mac
folder item will create a filter category comp.sys.mac.*, filters
within which will apply to all groups in this tree, such as comp.sys.mac.comm
and comp.sys.mac.programmer.codewarrior. Thus, the total set of filters
which are applied to articles in a group are the filters specific to that group,
as well as those defined for all higher levels in the hierarchy.
Dragging into the Filters window from a window displaying a list of postings (referred to as the Subject window) creates one or more new filters for the dragged article(s). If you clicked on the author name to start the drag, these will be created as author filters, or if you dragged from the subject column, they will be subject filters by default. The dotted outline that you see when dragging tells you how the filters will be created. Of course, after creating the filters you can double-click on them in the Filters window and change the settings.
You can drag filters around in this list to move them to different groups, or re-order them within the group (which changes the order in which they are applied to articles). Dragging a group item within this list simply moves all its filters. You can also drag items to and from the desktop, to create clippings files, which are used for filter conversion.
When a window showing one article is frontmost (and when an article is highlighted in a window showing the list of articles for a group), a couple of entries on the menu are enabled. These are and , which create author or subject filters for the active articles respectively.
Double-clicking a filter item in the Filters window will bring up the Filter Edit dialog, described in more detail below. Double-clicking on a filter category brings up the Group Filter dialog, also described below.
The Group Filters Dialog
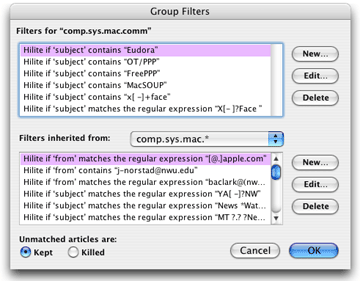
With a group selected in a User Group window or the Full Groups window, or a window frontmost that is associated with a specific group, choose the command on the menu to show the Group Filters dialog (above). If you wish, you can use this dialog to create and edit filters for this group, as well as categories above the current group. All these actions you can also do in the Filters window.
Almost everything you can do in this dialog can also be achieved in the Filters window, or via the menus. This dialog contains one unique setting, in the pair of radio buttons in the lower left corner, Unmatched articles are Kept/Killed.
- Unmatched articles are Kept
-
This is the normally active option. Articles that are not matched by any filters in this group will be displayed as normal. Groups for which this option is enabled have a checkmark on their folder icon in the Filters window.
- Unmatched articles are Killed
-
If this option is selected, all articles in this group that are not matched by any filters are removed, as if a kill filter has been applied to them. This option is useful if you only want to see some small subset of the articles in a group; instead of making kill filters for all those you don't want to see, make Keep or Highlight filters for those you want to see, and select this option to have the rest removed. Goups for which this option is enabled are shown with a small "X" on their folder icon in the filters window.
From this dialog you can also create new filters, and reorder filters within groups.
Creating Filters
Creating and Editing Filters
For detailed instructions on creating different types of filters, see the page on creating and editing filters.
Using Regular Expressions
For instructions on using regular expressions in filters, see the page on regular expressions.
Making Junk Message (“spam”) filters
A special type of filter can be used to detect junk messages (also known as spam). This is described in more detail in the Junk Message Filtering page.
Setting filter defaults
Each time you create a filter, it is initialized according to some defaults and, if appropriate, according to the action that created it. Those defaults you can set from the Preferences dialog. Go to the Filter options panel, and click the button labelled New filter defaults. This dialog will be displayed:

In this dialog, you can specify those defaults. Be aware that there are two independent color schemes that you can set for kill filters and for keep/highlighted filters. Move between them by choosing kill or keep, highlight from the action popup menu.
Filters and download time
Some filters require additional information to be downloaded from the news server to work, which can slow down group opening. This depends on your preferences for displaying authors, lines and dates, and whether you are using the XOVER command to get headers from the server. The rather complex interactions between the various options are described in the document on downloading time.
The Filters File
By default the filters file, where the filters are stored, is created in the same folder as the MT-NewsWatcher Preferences file. The file is called "MT-NewsWatcher Filters". But since MT-NewsWatcher stores an alias to this file, rather than hard-coding the path, you can move the filters file wherever you like on your disk, and the program should find it when it starts up. If it cannot, or it finds it in the Trash, you will get a warning. If you have more than one filters file (after, say, duplicating the one that was created), you can specify which one to use in the Filtering options Preferences panel.
It's probably a good idea to keep a spare copy of the filter file, when you have built up a good collection of filters. Accidents do happen, and filter files do get damaged. Sometimes. You could also just select all the filters and drag them to the desktop to make a text clipping (which encodes filter information) as a backup. To restore, just drag this clipping back into the Filters window.
Exporting and Importing Filters
Filters can be exported to an XML file, which is a text file containing all the information about the filters, with some formatting. You may find this useful if you wish to inspect information about all the filters easily, or do some bulk change to a set of filters.
To export filters to XML, open the Filters window and choose from the menu. Specify a location for the saved file, and click Save. You can open the resulting file in any text editor, although you may find it easier to examine in an editor that understands XML, like BBEdit.
Filters can also be imported from XML. To do this, locate the file in the Finder, and drag it into the Filters window. The filters in that file will be added to your existing filters, so this action is not destructive.
Filters can also be exported in a clipping format which is plain text, but doesn't contain
all the information in the filters. However, it can be useful for exchanging filters with others
via email or newsgroup posts. To transfer filters using this method, simply select one or more
filters in the Filters window, and drag them into a text document (which may be a Message window,
or a plain text editor in another application). To import filters, select the text which starts
with GROUP=, and drag it into the Filters window. The plain text format used for
this method of filter transfer is described in the next section.
Converting YA-NewsWatcher filters
Note: YA-NewsWatcher and its more recent brethren Thoth are not longer available, so this section is only of interest if you already use either of those newsreaders, and wish to convert filters for use with MT-NewsWatcher.
Converting filters from YA-NewsWatcher requires Brian Clark's Filter-to-TEXT utility. Run this on your filters file, to get a text file with the filter specifications in it. The text file looks something like:
...
#
GROUP=.
KEPT=kFalse
#
STRING=money
HEADER=subject
MATCH=kContainsTheString
EXPIRE=0
IGNORECASE=kTrue
SCORE=0
LABEL=0
...
Select this file in the Finder, and drag it into MT-NewsWatcher's Filters window. MT-NewsWatcher will open the file, parse its dragged text, and create a set of filters as close as it can to the YA-NewsWatcher filters.
Because of differences in the filter format of the two programs, the conversion is not always perfect; in particular, lines and dates filters will not convert well if you used both "longer" and "shorter", or "before" and "after" numbers in the same YA-NewsWatcher filter. They will also be created with the default highlight colors (as set in preferences).
To convert MT-NewsWatcher filters back to YA-NewsWatcher, drag them out of the Filters window into the Finder, to create a text clipping, or directly to a drag-aware editor. Then save into a text file, and use Brian's TEXT-to-Filter utility to convert back to YA-NewsWatcher filters.
Suggest some filters!
You will soon build up quite a collection of filters as you realize how useful they are. From my own completely biased, Mac-based viewpoint, here are some that I use:
- *
- Kill if 'subject' contains 'money'
- Kill if 'subject' contains '$$$'
- Highlight if 'author' contains 'me@mydomain.com'
- comp.sys.mac.*
- Highlight if subject contains 'NewsWatcher'
- Highlight if 'author' contains 'apple.com'
You can see more in the snapshot of my Filters window near the top of this page, and there are also some funky regular expression-based filters on the page on regular expressions.
Because MT-NewsWatcher can save filters in clippings files, you can swap them with other people (you need to send them as encoded attachments by email). If you have a really funky regular expression-based filter, feel free to email me a copy. Alternatively, you can simply drag and drop into a text-capable program (e.g., directly into Eudora) to exchange them in text format. You loose the colors, but the rest comes through fine.
Download filters
Scott Forbes is maintaining a page from which you can download MT-NewsWatcher filters, in clipping format.
Creating filters
Read on to find out how to create and edit filters.
Table of Contents
- Preface
- Table of Contents
- Introduction
- Features
- Advanced features
- The Interface
- Appendices